What is a Cube?
A Cube is a way to play limited without spending a fortune in boosters, be it sealed, draft or even Pack Rush, you can do it with a cube.
In more strict terms a Cube is a curated list of cards that you put together and randomize to play limited with.
You use the Cube by shuffling it and separating “boosters” that you then use as you would normally do.
If you don’t want to know how to make one and just want an example, you can check my current Lorcana Cube here.
The rest of the article is about the design principles and how you can make your own, which I think is a fun and rewarding thing to do.
Main Principles
There are a few differences between creating a Cube for Magic and for Lorcana. For starters, the card pool is significantly larger on Magic. However now that we have 6 sets, there is a good amount of variety to build around.
One key important point of Lorcana limited is that there is no color restriction to the decks, so there is no real reason to require that each ink has the same amount of cards (although I like to do it for balancing purposes)
Before you start picking cards for the cube, you want to decide on the size of the cube, based on how many players you want to support, and the general flavor for the cube.
Let’s dive into it
Size
The first decision of the cube is its size. You should pick it based on the number of players and type of play you want to support. It is easier to start with a small cube and expand it over time. Here are some sizes:
- 96 cards. This is the smallest possible cube. It supports 2 people draft: each player gets 4 boosters of 12 cards. You will be using the entirety of the cube each time,
- 144 cards. This cube allows for 3 people draft / 2 people sealed, which is 12 boosters. If you use it for 2 people draft, you’ll be leaving 1/3 of it out each time, which provides more variety
- 192 cards. This allows for up to 4 people draft (16 boosters). It is a great size, and it is possible already with the current amount of cards released in Lorcana
- 240 cards, this is my current preferred size, it gets a nice rounded number of 40 cards per ink. This size has a couple of extra benefits:
- It is very close to the size of an actual Lorcana set (they are 235 cards on average)
- You do not exhaust the cube on a 4 people draft
- 384 cards: Minimum cube for 8 people draft. I think is a bit of a stretch with the number of cards we have so far
Getting started making your cube
Once you know the size, it is time to pick a theme. It is OK if the theme is “the spare ones from my collection”, in fact that is how I started mine, and then lately I started buying cards in sets of 5: A playset, and one for the cube.
If you don’t have enough cards, there are 2 ways to boootstrap a Lorcana cube:
- Play limited, then take the cards and make that your initial cube. There will be duplicates, but at least you’ll have enough cards to start filtering from
- Buy a couple of sets of commons and/or uncommons. There’s 72 commons and 54 uncommons on each set, so 1 set of commons and uncommons from any set would be enough to have a 2 people cube, and it will be already balanced.
Once you have your initial pool of cards, it is time to make the cube balanced.
Keeping the Cube balanced
Although you can make a Cube that is unbalanced on purpose, I think it is best to first get used to making a balanced cube, and then know how and why you want to break such balance.
First things first, the card type ratio. From my own experience building cubes, and also from the current distribution of Lorcana sets, you should have:
- 75% Characters
- 25% Non-Character, of which
- 10% Items,
- 10% Actions, of which 1/2 should be Songs
- 5% Locations
You can make this a global configuration, which is easier, or you can try each ink to adjust to it as well
For the characters, it is best if you follow a curve that peaks at cost 4, This ensures that you have small characters to play at the beginning, while allowing some interesting mid and late play actions when the cards of cost 4 or more come into play.
A sample distribution would be:
- 12% of cost 1
- 14% of cost 2
- 16% of cost 3
- 18% of cost 4
- 15% of cost 5
- 13% of cost 6
- 12% of cost 7 or more
Which in my current 220 cards cube, looks like this (note that cost counts for all card types, not just characters)
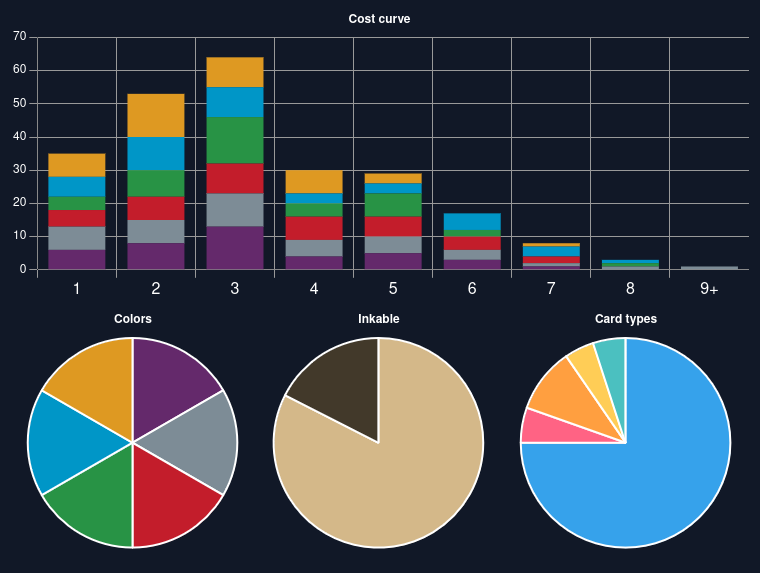
Which, as you can see, is already skewed towards cost 3.
To simplify the numbers, in the 240 card cube, each Ink has 40 cards, split like this:
- 30 Characters
- 3-4 Characters of cost 1
- 4 Characters of cost 2
- 5 Characters of cost 3
- 6 Characters of cost 4
- 4-5 Characters of cost 5
- 3 Characters of cost 6
- 3-4 Characters of cost &7 or more
- 10 Non-Characters
- 4 Items
- 8 Actions (of which 4 are Songs)
- 2 Locations
I recommend to take the numbers as a guideline and give some space for improvisation, some colors have better items, others have better songs, and other have better locations. I tend to keep the number of non-characters constant, but only enforce that the total amount of each type is correct, instead of forcing each ink to have the exact numbers.
Other balance considerations
Keep a low number of non-inkables, they are very costly in limited. Again following a stardard Lorcana set, this should be no more than 28% of your cube, but I prefer to keep it lower at around 20%, and I recommend that you distribute it across all card types and costs.
Try to avoid having too much of a particular keyword. If everything has evasive, it is a lot less relevant. Same goes for Ward, Rush, Challenger, Support, Bodyguard, Resist, etc.
A Lorcana set has roughly this distribution of keywords amongst characters:
- 2% Singer and Reckless
- 3% Support, Ward, Rush, Challenger and Resist
- 4% Bodyguard
- 8% Evasive
For me, the first sets had too many vanilla creatures and I think it is fine to have more of them. However, I advise to keep the proportion: twice as many Bodyguards as Singers and Reckless, and twice as many Evasive as Bodyguard.
It is OK to tweak your cube to your preference, but you should not tilt it too much or all the games would be similar
Try to have variety, at cost 3 you can have a 3/3 that quests for 2 (Mickey true friend, Jasmine disguise, Kristoff) but it is best if you spice it up with some 2/4 like Felix Madrigal, Nala and Piglet, and there are other different combinations. Keep it varied.
Use vanilla cards thoughtfully, they are usually great as a shift target. If you are trying to decide between Stitch, Kida, The Queen and Vanellope as your 2/2 for 1 in Amber, the one that can be shifted on should take precendence (in my case that is The Queen)
Things to avoid
Keep in mind that a normal set is designed to provide cards for both limited and constructed. In a cube we can remove all the cards that are designed for constructed.
- Build-Around: Be Prepared, Ariel – Spectacular Singer, and Prince John – Greediest of All, are great cards to build around, but not great for limited
- Bombs: Cards like Beast – Tragic Hero, Rapunzel – Gifted with healing and Diablo are extremely powerful, and constructed decks do have answers for them. but in limited they may be impossible to overcome. In general you do not want those in your cube (and you’ll also save quite some money by nor putting them in)
- Strong themed “typal” cards. Some examples are: Mickey – playful sorcerer, Mirabel Madrigal – gift of the Family, The Queen – fairest of all, and the Dwarves. While a theme focused deck on Brooms or Madrigals is fun, they are not great in limited.
Final notes
Playing with a Cube is fun, building it is also fun, and of a completely different type, it can help you understand game and set design if that is something you are interested on, it is similar to deck building, but at a different level.
There is no wrong way to build a Cube, the only bad decision is to let perfect be the enemy of done. Start playing with it as soon as you have it, and tweak it.


 Given that it will take about a month until they arrive, I have to start thinking about the other areas.
 You can read more about flow in the article: